
繼上一篇實做 ESP32 使用 MicroPython 控制 L298N電機控制模組後,本篇實做如何讀取溫濕度感測值,並將結果以 Web 方式呈現當時的溫濕度給用戶端。使用 Python 語言在開發板控制上面,我也算是初學者,就用幾個實做來瞭解一下如何運用 MicroPython 操控開發板,以下就來看一下如何使用 DHT11 溫濕度感測器連接 ESP32,並取得感測值。


程式二:
在 uPyCraft IDE 介面的顯示框,可以看到連線的 IP:

然後使用瀏覽器透過Web連線,在URL處輸入 IP即可看到以下畫面:


[線路圖]
DHT11有四隻接腳,從左到右,分別是VCC、DATA、NULL(沒有作用)、GND。我們將 DATA接腳接到 GPIO14,VCC跟GND則連接 ESP32的VCC及GND。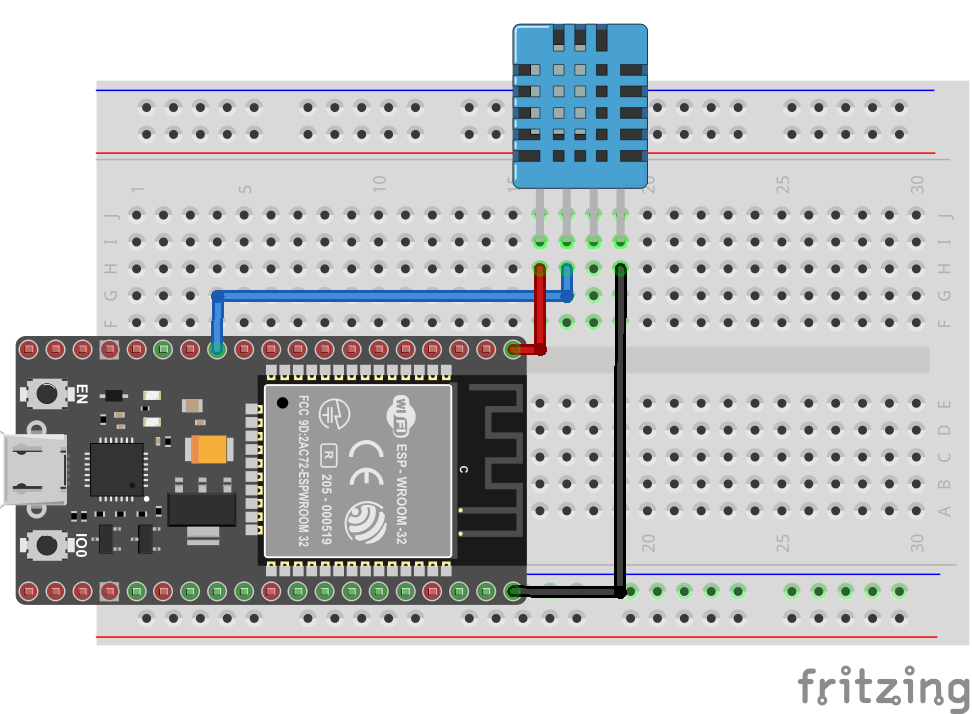
[程式一]
這段程式直接在 uPyCraft IDE上執行,在顯示窗可以看到執行結果。from machine import Pin
from time import sleep
import dht
#可依 DHT11/DHT22 決定哪一行加上#
#sensor = dht.DHT22(Pin(14))
sensor = dht.DHT11(Pin(14))
while True:
try:
sleep(2)
sensor.measure()
temp = sensor.temperature()
hum = sensor.humidity()
temp_f = temp * (9/5) + 32.0
print('Temperature: %3.1f C' %temp)
print('Temperature: %3.1f F' %temp_f)
print('Humidity: %3.1f %%' %hum)
except OSError as e:
print('Failed to read sensor.')
[程式二]
這段程式在 uPyCraft IDE上執行後,會在顯示窗顯示IP後,就等待回應。try:
import usocket as socket
except:
import socket
import network
from machine import Pin
import dht
import esp
esp.osdebug(None)
import gc
gc.collect()
#需更換自己無線AP的SSID及密碼
ssid = 'MyHome'
password = '12345678'
station = network.WLAN(network.STA_IF)
station.active(True)
station.connect(ssid, password)
while station.isconnected() == False:
pass
print('Connection successful')
print(station.ifconfig())
#sensor = dht.DHT22(Pin(14))
sensor = dht.DHT11(Pin(14))
def read_sensor():
global temp, hum
temp = hum = 0
try:
sensor.measure()
temp = sensor.temperature()
hum = sensor.humidity()
if (isinstance(temp, float) and isinstance(hum, float)) or (isinstance(temp, int) and isinstance(hum, int)):
msg = (b'{0:3.1f},{1:3.1f}'.format(temp, hum))
# 轉換成華氏溫度
#temp = temp * (9/5) + 32.0
hum = round(hum, 2)
return(msg)
else:
return('Invalid sensor readings.')
except OSError as e:
return('Failed to read sensor.')
def web_page():
html = """<!DOCTYPE HTML><html>
<head>
<meta name="viewport" content="width=device-width, initial-scale=1">
<link rel="stylesheet" href="https://use.fontawesome.com/releases/v5.7.2/css/all.css" integrity="sha384-fnmOCqbTlWIlj8LyTjo7mOUStjsKC4pOpQbqyi7RrhN7udi9RwhKkMHpvLbHG9Sr" crossorigin="anonymous">
<style>
html {
font-family: Arial;
display: inline-block;
margin: 0px auto;
text-align: center;
}
h2 { font-size: 3.0rem; }
p { font-size: 3.0rem; }
.units { font-size: 1.2rem; }
.dht-labels{
font-size: 1.5rem;
vertical-align:middle;
padding-bottom: 15px;
}
</style>
</head>
<body>
<h2>ESP DHT Server</h2>
<p>
<i class="fas fa-thermometer-half" style="color:#059e8a;"></i>
<span class="dht-labels">Temperature</span>
<span>"""+str(temp)+"""</span>
<sup class="units">°C</sup>
</p>
<p>
<i class="fas fa-tint" style="color:#00add6;"></i>
<span class="dht-labels">Humidity</span>
<span>"""+str(hum)+"""</span>
<sup class="units">%</sup>
</p>
</body>
</html>"""
return html
s = socket.socket(socket.AF_INET, socket.SOCK_STREAM)
s.bind(('', 80))
s.listen(5)
while True:
conn, addr = s.accept()
print('Got a connection from %s' % str(addr))
request = conn.recv(1024)
print('Content = %s' % str(request))
sensor_readings = read_sensor()
print(sensor_readings)
response = web_page()
conn.send('HTTP/1.1 200 OK\n')
conn.send('Content-Type: text/html\n')
conn.send('Connection: close\n\n')
conn.sendall(response)
conn.close()
[執行結果]
程式一:
程式二:
在 uPyCraft IDE 介面的顯示框,可以看到連線的 IP:

然後使用瀏覽器透過Web連線,在URL處輸入 IP即可看到以下畫面:

張貼留言